"Fun"? This forum is not to be used for fun.jkjerde wrote:Whooa. This is meant to be fun. Bragging rights between everyone, showing off your work to other forum members.
Post your before and after pics here!!!
-
t4k
- Senior Member
- Posts: 1058
- Joined: April 12th, 2008, 8:47 pm
- Enter the middle number please (3): 5
- Location: U.S.
- Contact:
Re: Post your before and after pics here!!!
-
GLASSTIME
- Member
- Posts: 408
- Joined: January 26th, 2009, 4:28 pm
- Enter the middle number please (3): 5
- Location: Gaston, North Carolina
- Contact:
Re: Post your before and after pics here!!!
This topic could go on and on.
I feel the big picture here is simple and there is many ways to look at this topic and situation.
In my business we have always took before and after photos. 1 for prospecting as to give he customer a visual.
This method was mostly used in our detailing services.
When adding WSR we applied the same methods and too had the same problem. after taking the photo of the "after*l we could not see the small blemish.
What we tried was placing the "Delta Kits" mirror inside behind the chip, it helped but then had a reflection.
Second we circled them, Third We made an small arrow out of poster board. And attached to WS using a suction cup pointing at the repair.
We then took our scribe pointed at the completed repair and snapped a shot!
We use the last two more than others.
Now I personally will not place before and after photos online as for several reasons.
1. I donot want to open a door I can't close. What I mean is I wouldn't want somone using my work for there glory.
2.I'm not one to "Flaunt" my expertise being Detailing, WSR or HLR! To others in the industry!
I don't think its neccesary to do so. My work speaks for itself and I have competitors around me that have used the tactics
Against us and lost customers over it. Now I understand this is the forum or the internet for that matter.
But bottom line its a touchy subject in my view!
Chad E. Clewis
President
GLASSTIME Windshield Repair & Headlight Restoration
"Its What You Put Into It That Counts"

President
GLASSTIME Windshield Repair & Headlight Restoration
"Its What You Put Into It That Counts"
-
pcb
- Junior Member
- Posts: 11
- Joined: November 25th, 2008, 7:28 pm
- Enter the middle number please (3): 5
- Location: Dublin, Ga
- Contact:
Re: Post your before and after pics here!!!
In my opinion, the biggest problem with after pics and the customer is the fact that they may not really see the small blemish that is left behind. If they go into the repair with the misconception that it will be perfectly clear then you have a whole other set of problems. I understand that explaining it to the customer is the proper way to do things and that is what I do but they will always want to back to the picture and say "well this one is perfectly clear" and then the problems really begin.
-
Roo

- Member
- Posts: 200
- Joined: February 13th, 2008, 10:32 pm
- Enter the middle number please (3): 5
- Location: Thornton, CO
- Contact:
Re: Post your before and after pics here!!!
Kgobin wrote:Roo, I think you have been trained by first-class professionals!
I agree 100%, that's why I chose Delta Kits...I had a gut feeling this was the route to go from the 1st phone conversation and I am so glad I came to Eugene for the training! What's weird is I still get nervous when I don't see the break begin to fill immediately, but I have found out that if I just walk away and let the tools do their work and be patient the results are fantastic!
BTW, I was a victim of a flying rock on Wednesday and have often thought what I would do in this situation. So I came home called my insurance company, told them what had happened. They said, "do you have a shop in mind to perform the repair? " I said "of course, Roo's Windshield Repair the only person I would ever trust to work on my windshield!" The guy laughed when he found out the insured was also the shop owner. It was fun getting to hear exactly what our customer's hear. BTW, Roo's was fantastic to work with, he came right to my house and the repair looks fantastic!!
-
jkjerde
Re: Post your before and after pics here!!!
Roo wrote:Kgobin wrote:Roo, I think you have been trained by first-class professionals!
I agree 100%, that's why I chose Delta Kits...I had a gut feeling this was the route to go from the 1st phone conversation and I am so glad I came to Eugene for the training! What's weird is I still get nervous when I don't see the break begin to fill immediately, but I have found out that if I just walk away and let the tools do their work and be patient the results are fantastic!
BTW, I was a victim of a flying rock on Wednesday and have often thought what I would do in this situation. So I came home called my insurance company, told them what had happened. They said, "do you have a shop in mind to perform the repair? " I said "of course, Roo's Windshield Repair the only person I would ever trust to work on my windshield!" The guy laughed when he found out the insured was also the shop owner. It was fun getting to hear exactly what our customer's hear. BTW, Roo's was fantastic to work with, he came right to my house and the repair looks fantastic!!
Thats awesome, lol
-
jkjerde
Re: Post your before and after pics here!!!
I think it turned out pretty good. One of the people I work with.
Before
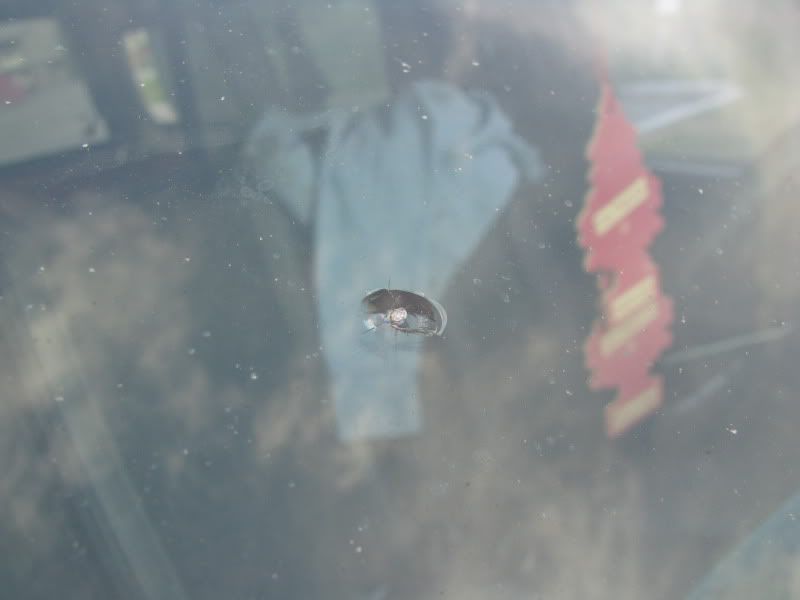
After

I have a question for you guys who are smarter than me. Why on my rock chip repair on the right side does it look like it didn't fill? Moisture? It was around 75-80 all day today so I don't think it is moisture, maybe it is. Can anyone tell me why that is the way it is.
Before
After
I have a question for you guys who are smarter than me. Why on my rock chip repair on the right side does it look like it didn't fill? Moisture? It was around 75-80 all day today so I don't think it is moisture, maybe it is. Can anyone tell me why that is the way it is.
-
GLASSTIME
- Member
- Posts: 408
- Joined: January 26th, 2009, 4:28 pm
- Enter the middle number please (3): 5
- Location: Gaston, North Carolina
- Contact:
Re: Post your before and after pics here!!!
jkjerde,
If your speaking about the "Black" spots.
I have ran into this as well and I'm sure the majority of us on here has as we'll
Its "AIR",
Always be sure to clean & prep the area of damage prior to cleaning. If your cleaning the WS before applying your bridge
Then the chance of the cleaning solution entering the void is highly possible and easy to overlook.
I always use my Moisture Evaporator on every repair regardless if its Hot or Cold out.
I'd want to be safe than sorry! Another thing to consider is to perform at least one extra pressure cycle and one extra vacuum cycle.
So that would be 4 pressure cycles and 3 vacuum cycles.
When beginning each vacuum cycle introduce it "Very Slowly"
Sorry to ramble on just trying to help per steps and precautions I take in every repair using "Deltas" system!
Chad E. Clewis
President
GLASSTIME Windshield Repair & Headlight Restoration
"Its What You Put Into It That Counts"
President
GLASSTIME Windshield Repair & Headlight Restoration
"Its What You Put Into It That Counts"
-
jkjerde
Re: Post your before and after pics here!!!
Time2Shine,Time2Shine wrote:jkjerde,
If your speaking about the "Black" spots.
I have ran into this as well and I'm sure the majority of us on here has as we'll
Its "AIR",
Always be sure to clean & prep the area of damage prior to cleaning. If your cleaning the WS before applying your bridge
Then the chance of the cleaning solution entering the void is highly possible and easy to overlook.
I always use my Moisture Evaporator on every repair regardless if its Hot or Cold out.
I'd want to be safe than sorry! Another thing to consider is to perform at least one extra pressure cycle and one extra vacuum cycle.
So that would be 4 pressure cycles and 3 vacuum cycles.
When beginning each vacuum cycle introduce it "Very Slowly"
Sorry to ramble on just trying to help per steps and precautions I take in every repair using "Deltas" system!
Thanks for the advice. All makes sense. This is why I am practicing on old beater vehicles, half of them don't work.
-
Kgobin
- Moderator
- Posts: 1107
- Joined: June 5th, 2008, 11:03 am
- Enter the middle number please (3): 3
- Location: Champaign, IL
- Contact:
Re: Post your before and after pics here!!!
Time2Shine has given you some good advice but below are some of Delta Kits thoughts.
Even though the temperature is around 75 to 80 degrees all day, you never know if your customer just had their car washed or if they have a hydrophobic coating on their windshield. As screenman says, "when in doubt, dry it out". The moisture evaporator is self-explanatory but many people don't realize it can also be used to remove hydrophobic coatings. However in order for it to be effective the tool needs to be preheated until the element is red and held flat against the glass for a full 20 seconds directly over the pit area. This works quite well for Delta Kits as this is how we use the tool, but it has been noted by several windshield repair technicians on this forum are not comfortable using the moisture evaporator in this fashion.
The ring around the edge is a pressure ring, sometimes called a flower or daisy, although if it is perfectly round I think pressure ring is a more accurate description. The more pressure you use, and the hotter the glass the more apt you are to see the pressure ring. The age of the glass and the age of the break also come into play as older glass or a break that has been open for an extended period of time will be more prone to delamination, which may cause the condition described above. To reduce the chances of getting a pressure ring, do not overheat the glass and use minimal pressure to fill the break. It takes a little longer to complete a repair this way, but depending on how concerned with the pressure ring it may be worth it to you.
Time2Shine was correct the black spots are air so here are some things to keep in mind. Applying too much pressure against the glass is the number one reason for black spots in a repair "after" removing the bridge due to the over flexing of the glass. Applying too little pressure against the glass can cause the seal to leak, so the key eliminating black spots is to apply just enough pressure to create a good seal without leaking. Also, it is recommended that the pressure and vacuum cycles are repeated until all visible air is removed and the break is completely filled with resin. Typically, it is a total of 3 pressure and 2 vacuum cycles that are used.
Korey Gobin
Delta Kits, Inc.

Delta Kits, Inc.
-
GLASSTIME
- Member
- Posts: 408
- Joined: January 26th, 2009, 4:28 pm
- Enter the middle number please (3): 5
- Location: Gaston, North Carolina
- Contact:
Re: Post your before and after pics here!!!
"Old Beater Vehicles"
Had quite a few of those in my day!
Honestly I do practice repairs on a "Beater" in my fathe backyard. This paticular vehicle has been sitting there
Since I was 14. Its an oldsmobile that looks like a "Rustomobile"
My repairs are always successful!
Practice Will Make Perfect!
Had quite a few of those in my day!
Honestly I do practice repairs on a "Beater" in my fathe backyard. This paticular vehicle has been sitting there
Since I was 14. Its an oldsmobile that looks like a "Rustomobile"
My repairs are always successful!
Practice Will Make Perfect!
Chad E. Clewis
President
GLASSTIME Windshield Repair & Headlight Restoration
"Its What You Put Into It That Counts"
President
GLASSTIME Windshield Repair & Headlight Restoration
"Its What You Put Into It That Counts"
Who is online
Users browsing this forum: Bing [Bot], Google [Bot] and 4 guests